A solid used RV buying checklist is your single best tool for dodging a bad deal. It’s more than just a list—it’s a game plan that walks you through the four most critical areas: the exterior shell, the interior systems, the mechanical guts, and the paperwork.

The dream of hitting the open road—or the open water—is what gets us all into the lifestyle. But that dream can sour fast if you end up with a vehicle that needs thousands in unexpected repairs. The best way to protect yourself is to go in with a strategy, not just excitement.
This guide isn't about generic tips. It’s a real-world framework I've seen work time and again. Think of it as your battle plan for inspecting any used RV. We're going to dive deep into how to sniff out hidden water damage, spot signs of mechanical trouble, and make sure the paperwork is squeaky clean.
To keep things from getting overwhelming, your inspection should focus on four core areas. These are where the most common—and most expensive—problems hide. By zeroing in on these pillars, you can quickly get a feel for the true condition of any RV.
I always tell people to think of their inspection in terms of these "four pillars." It helps you stay organized and ensures you don't miss the big-ticket items that can turn a great deal into a money pit.
|
Inspection Area
|
Top Priority Check
|
Why It Matters Most
|
|
Exterior Integrity
|
Water Damage & Seals
|
Water is the #1 killer of RVs. Delamination and rot are costly, often irreversible, and can be easily hidden.
|
|
Interior Systems
|
Appliance Functionality
|
You're buying a house on wheels. Fridges, furnaces, and A/C units are expensive to replace. Test every single one.
|
|
Mechanical Health
|
Engine, Tires & Frame
|
Forgetting the "vehicle" part is a classic mistake. A beautiful interior doesn't matter if it can't get you there safely.
|
|
Paperwork & History
|
Title & Service Records
|
A clean title proves ownership. Service records tell the story of how the RV was treated and reveal potential recurring issues.
|
Nailing these four areas will give you a clear picture of what you're really buying. It’s about looking past the shiny surfaces and understanding the rig’s true health.
The used RV market is booming right now. Even as new sales have leveled off, private peer-to-peer sales recently shot up by an incredible 111% year-over-year. More people are looking for affordable ways to get into the lifestyle, which makes a detailed checklist more important than ever for separating the gems from the duds.
Before you even step foot in an RV or on a boat, have your financing sorted out. Knowing your budget and having a pre-approval in hand gives you confidence and serious negotiating power.
A big part of that is figuring out the best way to pay for it. Take some time to compare your options by understanding the difference between personal loans and auto loans before you start shopping.

The outside of an RV tells a story, and your job is to read it carefully. A thorough walkaround is your first and best defense against buying a money pit. This is where you put on your detective hat and look for the subtle clues that most buyers walk right past.
Your number one mission is hunting for evidence of water intrusion. Water is the arch-nemesis of any RV, leading to rot, mold, and expensive structural failures. The most obvious sign is delamination, which looks like bubbles, ripples, or waves in the fiberglass siding. Run your hand flat along the sidewalls—if it feels anything other than perfectly smooth, that's a huge red flag signaling water damage behind the wall.
Every window, door, storage bay, and vent is a potential entry point for water. The sealant, or caulking, around these openings is the only thing keeping the elements out, so you need to inspect every single inch of it.
You're on the lookout for sealant that is:
-
Brittle or Cracked: Squeeze it lightly with your fingernail. If it’s hard as a rock or crumbles, it’s old and has failed.
-
Pulling Away: Look for gaps between the sealant and the RV body. Even a tiny gap is a direct highway for rain.
-
Missing Entirely: It happens. Sealant can just wear away over time, especially on the roof where it's baked by the sun.
Good, healthy sealant should be pliable and form a consistent, clean bead. Any sign of neglect here means the rig has likely been exposed to moisture, even if you can’t see the damage yet.
Next, you have to get up on the roof—the most vulnerable part of any RV. Ask the owner if you can use their ladder or, better yet, bring your own. A clean, well-maintained roof is often the sign of a meticulous owner.
Never just assume the roof is solid. Tread very lightly, especially around vents and along the seams. Your feet are surprisingly good at detecting soft spots, which scream that the plywood underneath is rotting from moisture.
While you're up there, check the condition of vent covers and skylights. These plastic parts get brittle and crack with sun exposure. They're cheap to replace, but a broken one is basically an open invitation for a leak.
Don't just kick the tires—inspect them like a pro. The tread depth might look fantastic, but RV tires almost always age out before they wear out. Look for the DOT stamp on the sidewall, which has a four-digit date code. A code reading "3521" means the tire was manufactured in the 35th week of 2021. The consensus among experts is that RV tires need to be replaced every 5-7 years, no matter how much tread is left.
Finally, you need to operate every single thing on the outside. This is a non-negotiable part of your used RV buying checklist. Extend and retract the awning completely, watching for any jerky movements and checking the fabric for tears or mildew. Cycle the slide-outs multiple times, listening for grinding noises and making sure the rubber seals are soft and create a tight fit when closed.
While a shiny exterior is nice, the real deal-breakers—the problems that will drain your wallet and your patience—are almost always found inside. This is where you need to put on your detective hat. Learning how to spot the subtle clues of neglect or damage is probably the most important skill you can have when shopping for a used rig.
Your best tools for this job are your own senses. Water damage, the undisputed champion of RV killers, rarely announces itself. It’s more of a whisper. Look for faint, yellowish water stains on the ceiling, especially around vents, air conditioners, and skylights. Run your hand along the walls and the ceiling. Pay close attention to the inside of closets and cabinets where moisture loves to hide. You're feeling for anything that feels soft, spongy, or even slightly bubbly. Those are tell-tale signs that the structure behind the wall panel is rotting away.
You can’t just take the seller's word that "everything works." The only way to be sure is to get in there and test every single system yourself, just like you would if you were setting up camp for the weekend. Don't feel awkward about it; this is your chance to find a $2,000 problem before it's yours.
Go through this checklist methodically. It'll take some time, but it's worth it.
-
The Water System: Flip on the water pump. You should hear it whir to life, pressurize the system, and then shut off. If it keeps running and running, you've got a leak somewhere. Next, turn on every faucet—kitchen, bathroom sink, shower—and flush the toilet. You're looking for good, steady pressure and making sure everything drains as it should.
-
The Refrigerator: This is a big one. An RV fridge can be a huge expense to replace. You have to test it on both electric and propane. It won’t get cold right away, but you should be able to hear it kick on in both modes. A fridge that only works on one power source is a classic used RV problem.
-
HVAC Systems: Crank up the furnace. Let it run for a few minutes until you can feel hot air coming out of the vents. Then, do the same with the air conditioner. Listen for any weird squeals, rattles, or grinding noises from either one.
-
The Water Heater: Just like the fridge, test the water heater on its gas and electric settings. You won't get hot water instantly, but when you switch it to propane, you should hear that distinct whoosh of the burner igniting.
This chart highlights some of the most common system failures we see in used RV inspections.
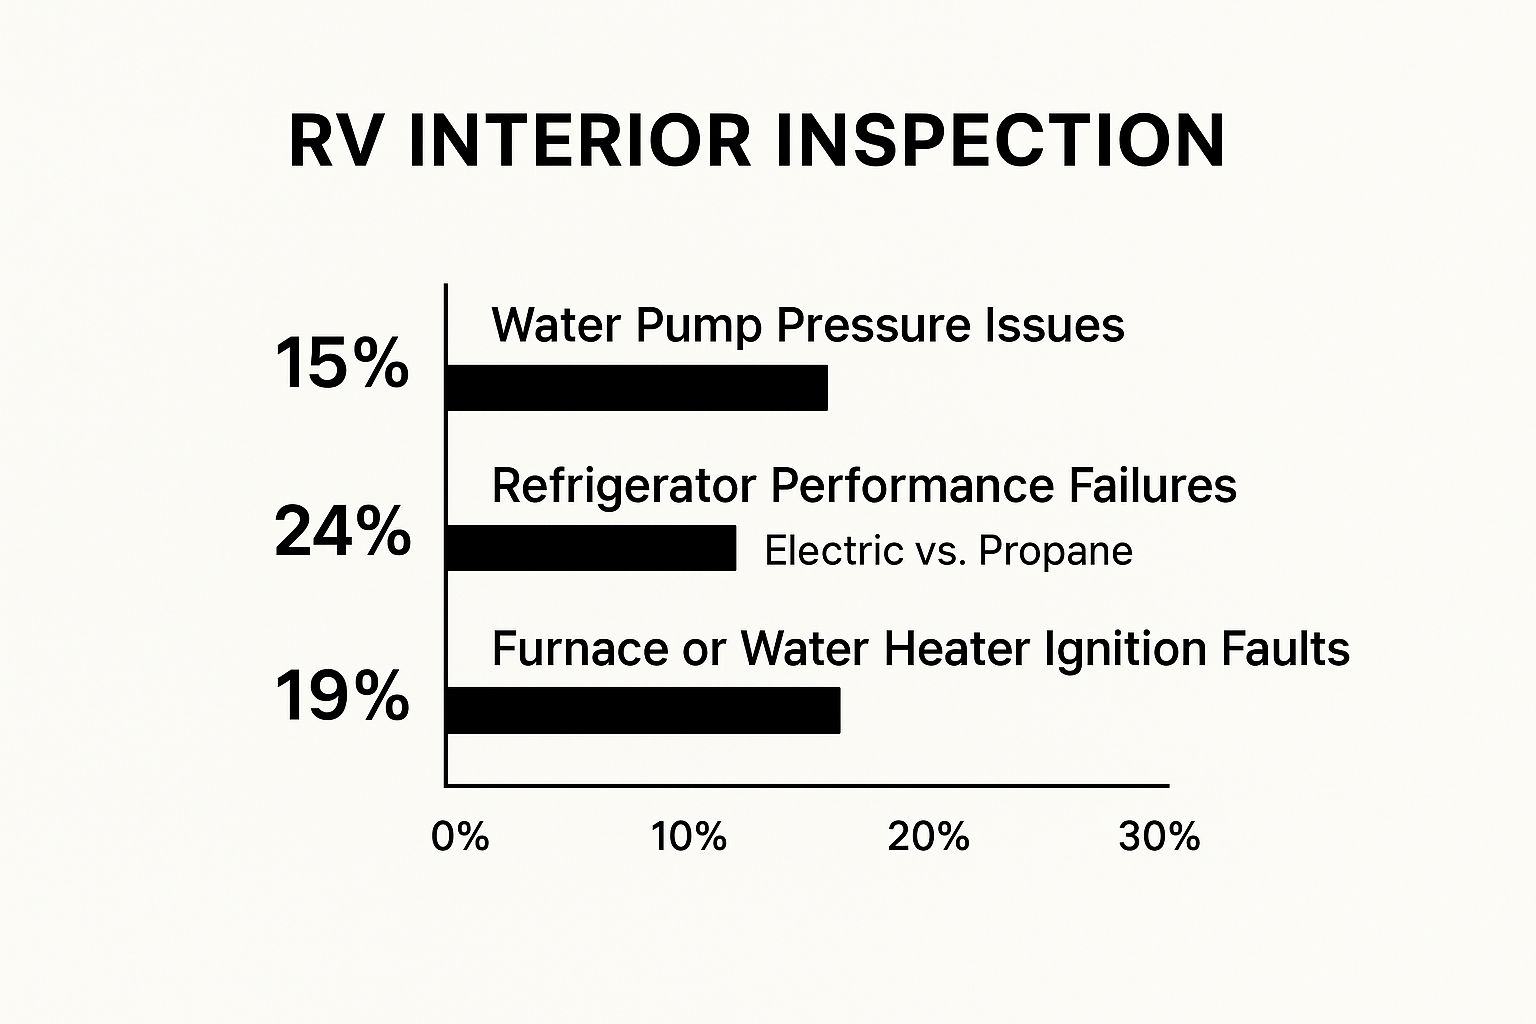
Notice how often dual-source appliances like refrigerators and water heaters pop up? That’s exactly why you have to be so thorough in testing them on both power sources.
Once you've tested the big-ticket items, it's time to sweat the small stuff. These are the things that can make daily life on the road either a joy or a massive headache.
Flip every single light switch. Bring a phone charger or a cheap outlet tester and check every electrical outlet. Look closely at the windows—do you see any fog or condensation between the panes? That means the seal has failed, and it's an expensive fix.
Trust your nose. If you smell anything musty or like mildew, don't ignore it. That smell is a massive red flag for hidden water damage. It's a scent that's nearly impossible to eliminate and almost always points to serious rot and mold behind the walls or under the floor.
Finally, get physical with the RV. Open and close every cabinet door and every drawer. Make sure the latches catch securely—the last thing you want is all your stuff flying out on the first sharp turn. Most importantly, walk every single inch of the floor, deliberately putting your weight down. You're feeling for any soft or spongy spots. A solid floor is a non-negotiable; a bouncy one is a sign of subfloor rot, and that’s a repair bill you don't want.
https://www.youtube.com/embed/IeEo_Jjmk3s
While the fancy interior is what often sells an RV, it's the "bones" and the engine that get you to the campground and back safely. Ignoring the mechanical and structural side of things is a classic rookie mistake, and it's almost always a costly one.
Your inspection strategy has to be different for a motorhome versus a towable trailer. Each has its own set of critical things that can go wrong.
When you're looking at a motorhome, you're buying a house and a truck all rolled into one. So, the first thing you should do is pop the hood. Start with the absolute basics: check the engine oil, transmission fluid, and coolant. Don't just look at the levels; look at the condition. Dark, gritty, or sludgy fluids are a major red flag. Get a good flashlight and hunt for any active leaks on the engine, around the hoses, and on the pavement underneath.
Then comes the test drive, and this part is non-negotiable. Kill the radio, roll down the windows, and just listen. Do you hear any strange clunks, whines, or grinding sounds when you accelerate, brake, or make a turn? A quiet, smooth ride is usually a sign of a well-cared-for machine.
A motorhome has its own engine and drivetrain to worry about, but that doesn't mean towables like fifth wheels and travel trailers get a free pass. They have their own unique structural weak points that you need to examine closely.
For any type of RV, you have to get on the ground and look at the frame. I mean really get under there. You're looking for serious rust that you can flake off with your finger, bent cross-members, or—worst of all—cracked welds. Pay extra close attention to the areas around the suspension and hitch assembly. Any of these issues point to major stress or serious neglect.
To help you focus your efforts, it’s smart to understand the key differences in what to look for between a motorhome and a trailer.
Motorhome vs Towable Inspection Priorities
|
Inspection Point
|
What to Check on a Motorhome
|
What to Check on a Towable
|
|
Engine/Drivetrain
|
Check all fluid levels and conditions, look for leaks, and listen for odd noises during a test drive.
|
Not applicable, but inspect the hitch assembly and emergency breakaway cable thoroughly.
|
|
Brakes
|
Test for a firm pedal feel and ensure the vehicle stops straight without pulling.
|
Inspect the brake drums/rotors for excessive rust and check the function of the electric brake controller.
|
|
Suspension
|
Look for worn-out bushings, leaking shock absorbers, and cracked leaf springs.
|
Inspect leaf springs for cracks or sagging and check that the axles are straight and not bent.
|
|
Generator
|
Start it and run it under load by turning on the A/C and microwave to ensure it provides stable power.
|
If equipped, test the generator under a full load just like you would on a motorhome.
|
This systematic approach makes sure you don't overlook a critical component just because you're more focused on one type of RV. Given the market, being thorough is more important than ever. Recent wholesale auction values for motorhomes averaged $63,540, which is a 15.8% increase in a single month. Towables also saw a jump, averaging $18,770, up 6.2%. This isn't the kind of market where you want to make an expensive mistake.
A critical test for any RV with an onboard generator is to put it under a full load. Start the generator, then turn on the rooftop air conditioner and the microwave simultaneously. If it sputters or shuts down, it can't handle the demand, signaling a potentially expensive repair.
Getting a handle on the RV's electrical systems is also a big piece of the puzzle. If the rig has solar, for example, it's worth reading a guide to MPPT charge controllers for caravans and campervans to understand how these vital components work. The more you know about the heart and bones of the RV, the better you can protect your investment.
Confirming the Paperwork and Ownership History
You can find the most amazing RV on the planet, but if the paperwork is a mess, you're not buying a dream—you're buying a nightmare. This is the last, and arguably most important, part of your inspection. Getting the documents right is what protects you from serious legal and financial headaches down the road.
The absolute first thing to look at is the title. This piece of paper is the legal proof of who owns the RV, and you need to make sure everything lines up perfectly.
Find the Vehicle Identification Number (VIN) on the title and immediately compare it to the VIN plate on the RV. On a motorhome, you'll usually find it on a sticker inside the driver's side doorjamb. For travel trailers, check the A-frame up front. If those numbers don't match exactly, stop right there. Don't make excuses for the seller—just walk away.
After you’ve matched the VIN, scan the title for any mention of a lienholder. If a bank or credit union is listed, it means they still have a financial claim on the RV. The seller must provide you with an official lien release document from that institution. Without it, you simply can't get a clean title transferred into your name. No exceptions.
This is also your chance to ask for service records. A big, fat folder of receipts is a beautiful sight. It’s a detailed story of how the rig was cared for, showing everything from routine oil changes to major repairs. This history can give you incredible peace of mind and alert you to any gremlins that have popped up in the past.
A seller who kept detailed records is likely someone who also kept up with roof sealing, winterization, and other critical maintenance. A lack of records isn't always a red flag, but a wealth of them is a huge green one.
Before you shake hands, find the RV’s weight sticker. It's usually a yellow or white label pasted inside a kitchen cabinet door or on the exterior wall near the entrance. This isn't just a suggestion; it's critical safety information.
You're looking for a few key acronyms:
-
GVWR (Gross Vehicle Weight Rating): This is the absolute maximum weight the RV can be when fully loaded with all your gear, water, and passengers.
-
CCC (Cargo Carrying Capacity): This tells you how much weight you can actually add to the RV in terms of supplies, clothes, food, and water.
Knowing these numbers is non-negotiable. If you're looking at a trailer, you have to be certain your truck can safely tow the GVWR. For any RV, you need to know if the CCC is enough for your needs. Overloading an RV is incredibly dangerous, putting massive strain on the frame, suspension, and especially the tires.
Verifying the history is more important than ever. The market for new RVs has seen its ups and downs, including an 11.98% year-over-year decline back in February 2025, which pushes more buyers into the used market. This increased activity makes a thorough paperwork check essential to ensure you're getting a solid investment. Staying on top of current RV market trends can give you a real edge as a buyer.
Even with the best checklist in hand, a few questions always pop up when you're getting close to a decision. It's totally normal. Let's walk through some of the most common ones I hear from buyers, because getting these answers straight can be the difference between a great purchase and a costly mistake.
Think of this as the final gut-check before you commit. Addressing these points head-on will give you the clarity you need to move forward with confidence.
Let me be blunt: yes. You absolutely should. While this guide gives you a solid foundation for your own walkthrough, a certified inspector brings a level of expertise and equipment that the average buyer just doesn't have.
They’ll show up with tools like moisture meters that can sniff out hidden water damage behind walls—the kind you’d never see or feel. They know the notorious failure points on specific makes and models from years of experience. A few hundred dollars for an inspection might feel like a lot now, but it's nothing compared to discovering a $10,000 delamination repair down the road.
Think of it this way: An inspection is your best insurance policy. If it comes back clean, you’ve bought incredible peace of mind. If it uncovers problems, you’ve just gained a massive bargaining chip to lower the price or the good sense to walk away from a money pit.
Some problems are just not worth inheriting. If you see any of the following, I strongly urge you to put your emotions aside and walk away. Don't fall in love with a floor plan and overlook a fatal flaw.
These are the big three issues that often point to widespread, systemic problems that are a nightmare to fix.
-
Any Hint of Water Damage: Water is the ultimate destroyer of RVs. Look for ceiling stains, discolored wallpaper, or bubbling (delamination) on the exterior walls. Press on the walls and floors, especially in corners and under windows. Any soft spots are a huge red flag. Water leads to rot and mold, and you want no part of it.
-
A Spongy or Soft Floor: If you feel any give, bounce, or softness as you walk through the RV, you're likely standing on a rotted subfloor. This isn't a simple fix; it's a massive, expensive repair that often means tearing out the entire interior of that section.
-
A Neglected Roof: An RV roof should look clean and well-maintained. If you see cracked or peeling sealant around vents and seams, or worse, if someone has globbed on tar as a "fix," that's a sign of serious neglect. A compromised roof has probably already let water in, even if the signs aren't obvious yet.
At SearchShop.com, our goal is to take the guesswork out of buying your next vehicle. Whether you're searching for an RV, a boat, or a motorcycle, our listings and research tools are designed to help you compare your options, check the history, and find the right fit with total confidence. Start exploring thousands of possibilities and make your next big purchase the right one at https://www.searchshop.com.
